

I’m so excited to be writing here on the Sewcialist blog today! If you don’t know me, I’m Elizabeth from Elizabeth Made This. I live in Colorado with my family of men and I sew every spare minute that I have. Today I’m sharing a tutorial for a quick and easy lace robe. If there’s one piece of “lingerie” that I can’t be without, it’s a robe. I’m always cold in the mornings even if it’s blazing hot outside and a robe is a great wardrobe piece to keep me warm before I drink my first cup of tea for the day.
This time of year, warmth isn’t as essential as it is during the winter months, so I’ve been kicking around the idea of a lighter, more summer weight robe to start the mornings. Lace seemed to be the perfect fabric for just this.

It’s lightweight, and sheer and an obvious choice for finer garments. With it’s dewy romantic look, can you think of a fabric that epitomizes lingerie more than lace?

Beyond summer, the sheer quality of lace makes it perfect for layering over other garments. Besides being something to toss on over pajamas in the morning, this time of year, a lace robe would be a great pool coverup.

Come fall, this would work really well over a skirt and sweater with boots. Whether you’re flipping pancakes or running errands, this lace robe will add a dash of soft elegance to your daily wardrobe.

This project uses French seams to enclose the raw edges of the lace on the inside of the garment. Because lace is sheer, your seams will show through to the other side, so this is not a project suitable for a serger. There are lots of options for hemming lace depending on what kind of lace you’re using, but on this one, I’ll keep it simple and assume you’re using a lightweight lace that can be hemmed with narrow (1/2″) hems.
Here’s what you’ll need:
- 2 yards 60″ lightweight lace
- tracing paper, ruler, scissors, and pens for making your pattern
- fine sewing machine needle (either Microtex 60/8 or universal 60/8)
- thread to match (Coats and Clark fine or something equally lightweight is great, but any all purpose polyester thread is good too)
- measuring tape
To start making your pattern, measure and record the following:
- Shoulder to shoulder divided by 2 (measure across back from shoulder point to shoulder point)_________
- Shoulder to neck edge (measure from shoulder to where your neck begins along the shoulder seam) ________
- Hip measurement + 12″, then divided by 4 __________
Make the pattern:
Draw out your pattern per the diagram on a very large piece of paper (mine was 50″ X 65″). You might have to tape together several pieces of paper.
Draw out two long lines perpendicular to each other, the vertical one being 60″ long, the horizontal one being at least 50″ long. Along these lines, you’ll plot the following points:
- center point to B=shoulder to shoulder divided by 2
- B to A= shoulder to neck edge
- A to C =shoulder point to desired length of sleeve (I chose 13″)
- C to D =desired sleeve depth–10-15″ is good (mine was 11″). Draw a dotted line in towards the center line perpendicular to the hem
- center point to E=30″
- E to F= hip measurement + 12″, divided by 4
- F to G =straight up from the hem, F will be 2″ past the intersection of the dotted line from step 4
- center point to H= desired front neck depth (mine is 5.5″)
- center point to I=1″–this is the depth of the back neck at CB
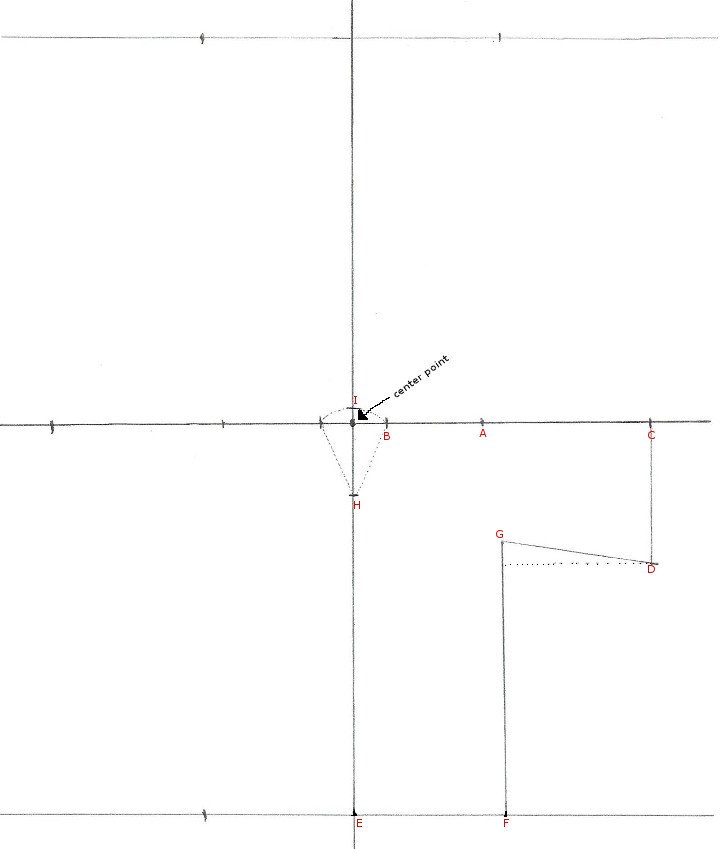
All 4 quadrants of the pattern will have the same measurements, with the exception of the area of where the neckhole is cut out (Fronts will be the same, but mirrored, and the backs will be the same, but mirrored). When you’ve plotted the points on one side, go to the next quadrant. Connect all of the lines per the diagram. Note that all lines are straight with the exception of the neck points, which should be slightly curved towards the neck points and CF. This is what my finished pattern looked like:

Add seam allowances of 5/8″ on the underarms and sides and a hem allowance of 1/2″ on the neck edge (CF hem allowance and bottom hem allowances are already figured into the pattern. Cut away the remaining paper from the center of the neck to the cut line edges.
Lay the pattern on your lace. This is a very large pattern, and you’ll be cutting it in one layer. Make a small hole with your scissors in the neck area, then cut out the neckhole, down the CF line, then around the perimeter of the pieces.

Needle down in fabric with presser foot up. Once it’s down, lower the presser foot and start sewing. No delicate fabrics getting sucked into the black hole of your machine innards.
**AWESOME LACE TIP!!!***: To keep the lace from getting sucked down into the machine at the beginning of each seam, place the fabric under the presser foot, but leave the presser foot up. Turn the fly wheel towards you to lower the needle down into the fabric. With the needle down, lower the presser foot and begin sewing.
Construction:
- Starting on the bottom of CF on one side, sew a row of straight stitching 1/2″ away from the raw edge all the way up CF, around the front and back neck and down the other side of center front. Fold the raw edge to the inside of the garment just beyond the stitching line. Roll the raw edge to the inside of the fold so that you have a small double turned hem.
- Stitch the hem with a narrow zigzag stitch (2.0 width, 1.5 length). If your lace is relatively stable and dense, you can use a straight stitch, but if you have a lot of holes in the lace, a zigzag stitch will work better and prevent snagged stitches.
- Put wrong sides together and sew up the side seam and underarm seam with a 3/8″ seam allowance, using the same narrow zigzag (2.0W, 1.5L) from step 2, pivoting at the intersection of the side and the underarm seam. Repeat on the other side. Clip into the corner, then trim the seam allowance down to about half of it’s original width.
- Flip the garment to the reverse side, then press the seams on a nylon setting.
- With the right sides facing in now, sew up the side seam and underarm seams with a 1/4″ seam allowance again, with that narrow zigzag stitch.
- Hem the sleeves and the bottom of the robe the same way you did for the neckline. That’s it!


lace robe natural habitat
See more of my work at Elizabeth Made This.


[…] Today I’m guest posting on the Sewcialist blog. […]
Great tutorial – definitely an article to save for later :o) Such a versatile garment.
Versatile was my goal in putting this together! I’m glad you found it helpful!
[…] Sew a Lace Robe, by Elizabeth Made This […]
That’s such a great robe! I can imagine wearing it around the house, or out on a date. Thanks for the great idea!!
Ooh, it’d be perfect for a date night! Thanks for that great idea!
need a printer hard copy so I can follow along?
Great idea Elizabeth. I like how you’ve styled it for fall too.
Lord knows in our weather if pieces can’t be layered, it’s all foolishness indeed!
I love your photos, Elizabeth! I’m going to keep thinking about how i’d make a knit version… but it seems like s fun project! It’s been ages since I drafted anything out from measurements!
Thanks Gillian! This would work so great in a knit version–my regular robe is similar made out of a double knit–it’s a great weight and warm. And if you’re looking to draft anything, this is a crazy easy thing to draft.
Pretty robe!
Thanks Kyle!
Very pretty! And thanks for the pattern drafting tips- I can imagine this as a nice casual cardigan too 🙂
Thanks Erin! Yes, I think it would a great cardigan over a tee and jeans!
[…] Tutorial: Sew a Lace Robe […]
This article is fantastic! You make drafting this lace jacket seem quite straightforward, I am definitely going to attempt this – I’ve been very intimidated about drafting, but wanting to give it a try, so this will be my toe in the pool. Thank you!
I’m glad you found it helpful! Go for it!
[…] You fall for this lace robe, impress with its dewy romantic appeal! The best pool cover-up to sew with the lace fabric quickly! The best fashion gift for a style loving lady too! Wear it over the skirt or pajama; it will be great in both ways! The leather belt with accent buckle brings a great wow factor to design! thesewcialists […]