

Hello Sewcialists. I’m Andrew. I’ve been learning to sew (at the ‘Open University of YouTube’) since 2014 and I’m over the moon to be a part of the #SewcialistsTNT month. I was lucky enough to have opened my Instagram just as the call went out for volunteers for this months theme, and here I am!
I suppose there is less variation in men’s clothes (…at least, there is in mine…) and maybe that is why I tend to revisit a lot of my patterns multiple times? For example, I can use the same shirt pattern, switching up some of the details, over and over again for different looks, that I know will fit. Each time I redo a pattern it gets a little easier, quicker and neater. Surely that’s a win?!
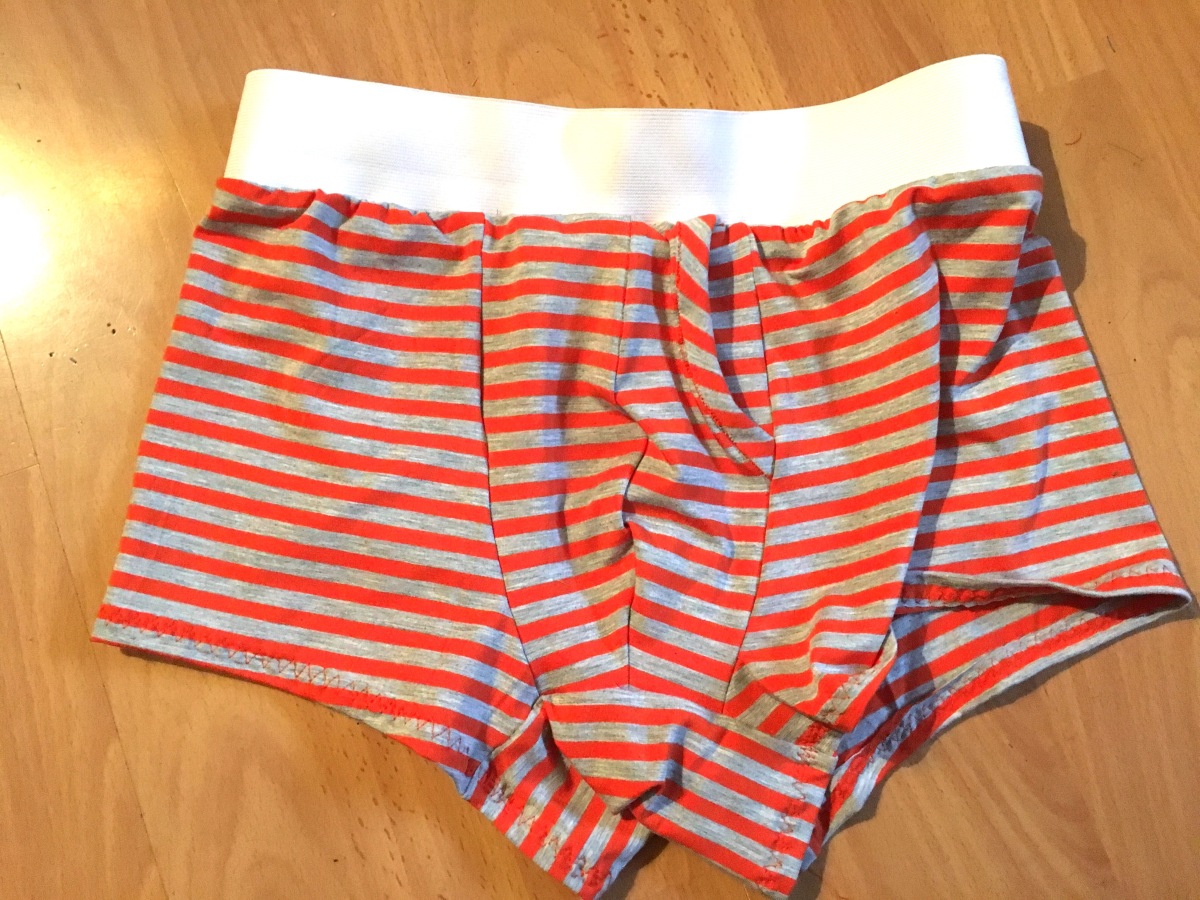
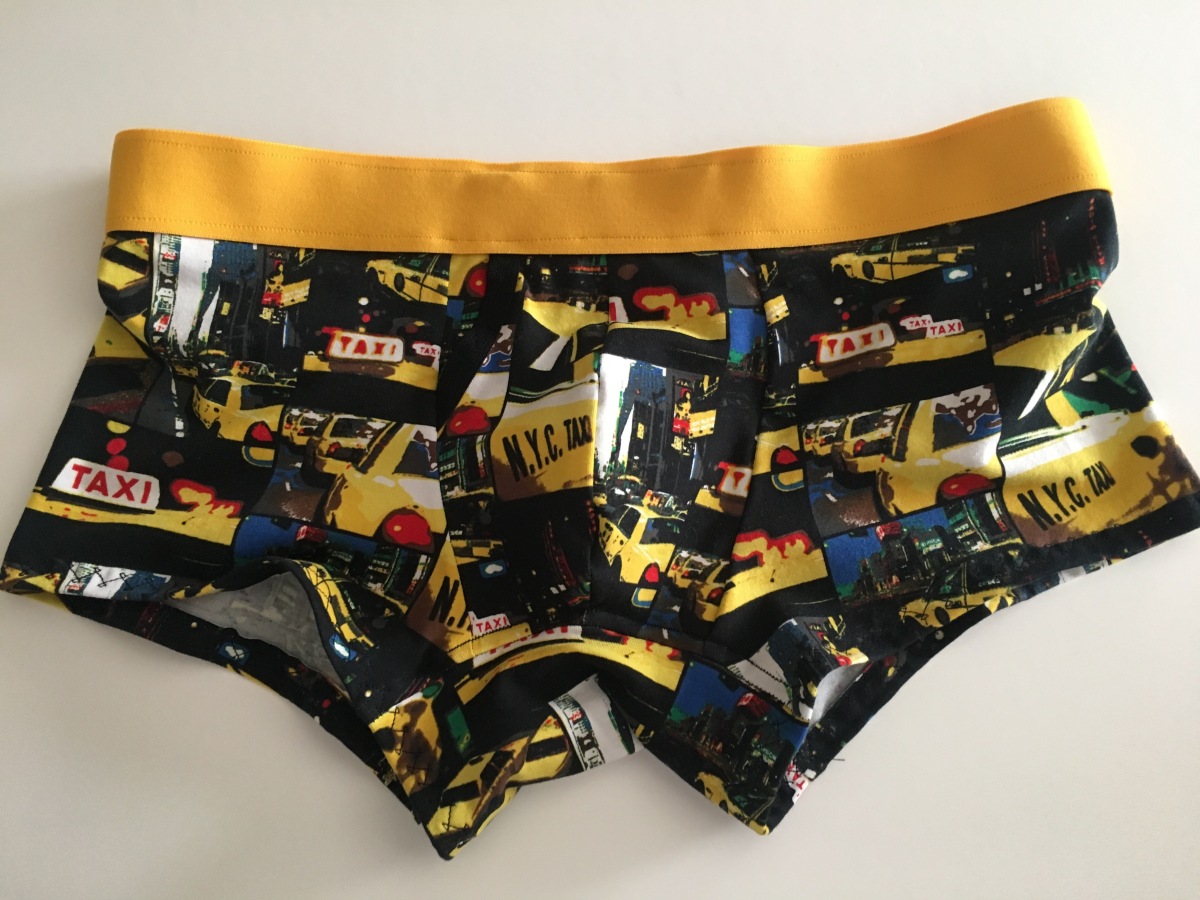
The pattern I want to share with you today is a great scrapbuster, a good introduction to sewing with jersey if you haven’t before. It’s also a great pattern for using up leftovers, and can be completed in just an hour or so. So if you want some new underwear or want to make some for the men in your life, here’s how I do it…
To date I’ve only used the Comox Trunks pattern from Thread Theory. It’s a well drafted pattern with good clear instructions. That being said, I can’t help but switch things around a bit and I was lucky enough to get how I made my last pair published in the May issue of SewSewDef Magazine!

One of the best pieces of advice from Thread Theory is to always start sewing with your needle down in the fabric. This helps to stop it from being chewed up under the sewing plate. Trust me, that is Jersey-Sewing-Gold! You’ll need to read the full instructions if you’re making them, I’ll just explain where I deviate…
SETTINGS.
I vary these, depending on the finish I want. Here are some of my favourites:
- 70 jersey needle
- Lightning stitch
- 3 thread overlocker
- Topstitch with lightening stitch
- Topstitch with triple stretch stitch
CUTTING OUT.
- I’ve taken a bit from the top as I find them a bit high waisted.
- Pardon me, but I’ve also added slightly to the base of the curve at the front to allow a bit of extra ‘room’.
- I cut a single rather than double gusset to reduce bulk.
FRONT.
If I have the right colour in stock I use fold-over-elastic to bind the front openings. I find it easier to apply, less bulky and will not stretch out with use. I sew it in place with one of the wide stitches on my machine, such as herringbone stitch or three step zigzag. These types of stitches have a lot of give and a wide reach.

(On this remake (below) I didn’t have matching fold over elastic, by the state of my binding, you can see why I prefer it! – sometimes it comes out really well, other times … well, let’s just say I’m glad I’m not superman and wearing them on the outside!)

When I line up the front pieces I match the bottom edge and the seam. This differs from the instructions as the top corners do not meet. This probably affects the size, so check it’s going to work for you, it works for me. And it means you’re in no danger of closing up the openings when they’re joined to the sides.
Crotch pieces prepared…

Butt going in…

Crotch going in…

GUSSET.
As I said, I use a single piece, but you might want to double it up for extra strength!
HEM.
I fold and pin the hems at 1cm then stitch it with the three step zigzag stitch. I used to use the twin needle to finish the hems, but this stitch has proved to be stronger in the long run.

WAIST ELASTIC.
On previous pairs I’ve done the waist elastic a little differently too. I find the trunks a bit high on the waist, so I either trim it down or sew it on this way. This method removes the excess for me while adding a nice smooth finish to the inside of the elastic.
- Using the lightning stitch again, and the foot as a guide, I sew the wrong-side-top-edge of the elastic overlapping 1cm with the wrong side top of the trunks.
- Then I fold the elastic over to the front and stitch near the bottom edge, using the foot as a guide again.


And then they’re done! On this remake, I trimmed down the top then sewed the elastic to the waistband, right sides together, overlocked (disengaging the blade) and turned over.

So hopefully that makes a bit of sense and maybe you feel encouraged to sew some underwear…
I think the only danger of sewing TNT patterns is complacency. It is still important to check your sizing and your stitch settings etc., especially if your fabric is different from last time.
Never in my craziest dreams did I imagine that one day my underwear would be seen ‘all over’ the internet! Much less that I’d be signing off a blog post like this…!
I’ll leave you with a few tops tips and my underwear ‘hall of fame’, if that doesn’t sound too weird!


Andrew’s Top Tips for Sewing Underwear:
- Pay attention to which side the opening goes (it’s different every time!)
- Good elastic is hard to find — always buy it when you see it.
- Practice applying binding to jersey.
- Stop flashing your pants on the internet!
Thanks for having me, Sewcialists! And if you’d like to see more of my sewing you can check out my blog MENSEW or find me on Instagram.
Happy sewing!
Fabulous undercrackers! Will have to add them to the list of things to sew for my bf when I stop being selfish! 😀
You can pretend you’re doing him a favour while using up all your jersey scraps! 👍😂
Very impressive undercrackers! (Love that term!) I’m terrified of knits, but may give these a try. The link to your blog didn’t work, but I found you anyway, and “enrolled” in Buster U. I’m thinking seriously about making my husband a shirt, and I wonder what you suggest? Classic, tower placket, simple? (He’s thin, but not as trim as you are.) Thank you!
Thank you! Sorry the link didn’t work… mensew.wordpress.com or @bustersew on instagram! ✅
I’m loving the shirt from the book The Gentleman’s Wardrobe at the moment… I’ve read great feedback on the Thread Theory button up too 👍🙏
Don’t be scared of knits ! Get take it slow, use a walking foot, and always start with your needle in the down position! 👍🤞
Thanks for all of the suggestions. The needle down makes complete sense, and I’ll have to try my walking foot with knits!
Thanks, very useful information. Happy creativity
You’re welcome 😊👍🙏
WOW…massive congrats on the feature!
‘Tis true…menswear patterns are much more standardized and likely to become tnts. And that’s a good thing. I never, ever, considered sewing unders for my guy, but you’ve sure made it seem doable!
Thank you so much! They’re totally doable! Go for it!
Andrew, I have never heard of that tip about starting to sew with the needle down. Thank you
It’s such a simple thing but makes the world of difference! I shouldn’t take credit though, I’m just passing on Thread Theory’s wisdom! 👍🙏
Great tips! Thank You! And I have the book Gentlemen’s wardrobe- haven’t made anything yet! Great fashion!
I sewed for my son (now 36) when he was a teen. Now I’m sewing for my youngest son 13 yrs old. My TNT patterns for him are from the 50s. And I re-use them over and over! He’s easy to please so he’s good with that as long as he picks the fabric. :o) Like you mentioned, complacency is the only thing that trips me up. If I watch too much BBC while sewing, even a pattern I’ve done 4 x, there’s always an “oops”! LOL! darn!
My new knits mantra- “needle down!”
Thank you! You’re welcome!
I’ve tried the shirt, wallet & waistcoat so far & all good (made a few changes to the wallet!)
Your son’s very lucky!
… yes, as mantras go, it’s not a bad one!
This is great! And reminds me I was going to sew a pair of these for my partner for christmas – we usually exchange socks and undies in our stockings, which started as a ‘joke’ and now is a tradition. Be careful with jokes, they can get out of hand! XD I’ll have to steal a pair of his existing unders to compare measurements, but I feel confident now that I can do his butt justice with my sewing. Thanks for posting! 🙂
I hope he liked them! 👍🎉
[…] TNT is the Freya Dress, Erica who’s a Linden Sweatshirt enthusiast, Andrew who shares his undies, or Sue’s wisdom on how TNT patterns can improve sewing skills and design […]
[…] It was a great feeling writing for another blog, the feedback was really encouraging and I hope to do it again in the future. In the meantime if you’d like, you can read about my underwear here! […]
I’m Scott. when I retired 19 years ago our youngest daughter, thinking i would head forbthr rocking chair and fade away, challenged me to make her a quilt. Armed with fabric, a borrowed sewing machine, and enough knowledge to get in serious trouble. I’ve been fabricating bags, a winter coat for our dog. But my wife of 56 years was diagnosed with Alzheimer’s. She enjoys embroiderin so the two us are making a quilt-as-we-sew quilt, using her embroidery squares as the blocks. It helps keep her busy.
Thanks for this opportunity to vent.
Your story has really touched my heart Scott, thank you for sharing it with me.
I think there’s nothing more special than a quilt, even more special for the two of you to be crafting together.
All the best,
Andrew
Thank you, Andrew. I appreciate your kind words.
[…] posts we have had previously from male sewists: a blazer, participating in Me Made May, sewing trunks,and this awesome comic-inspired […]